Introduction
This user guide describes Google Earth Version 4.2 and later.
Welcome to Google Earth! Once you download and install Google Earth, your computer becomes a window to anywhere, allowing you to view high-resolution aerial and satellite imagery, photos, elevation terrain, road and street labels, business listings, and more. See Five Cool, Easy Things You Can Do in Google Earth.
You can view a printable version of this user guide (free Adobe Reader required, English only).
 |
Use the following topics to learn Google Earth basics - navigating the globe, searching, printing, and more:
|
|
For other topics in this documentation, see the table of contents (left) or check out these important topics:
|
Getting to Know Google Earth
The following diagram describes some of the features available in the main window of Google Earth:
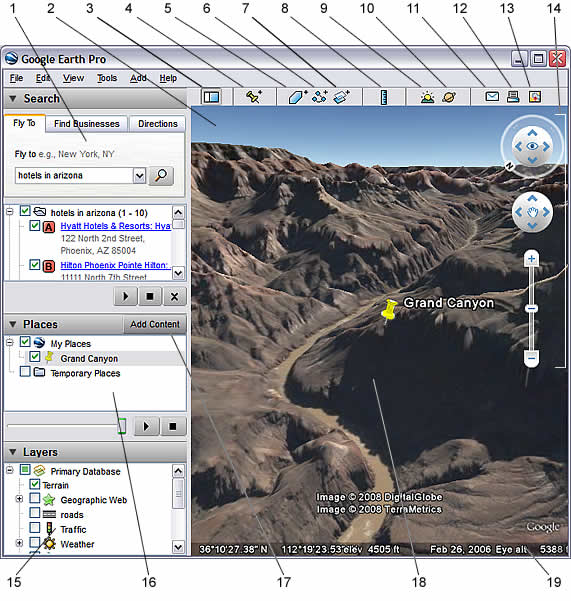
- Search panel - Use this to find places and directions and manage search results. Google Earth EC may display additonal tabs here.
- Overview map - Use this for an additional perspective of the Earth.
- Hide/Show sidebar - Click this to conceal or the display the side bar (Search, Places and Layers panels).
- Placemark - Click this to add a placemark for a location.
- Polygon - Click this to add a polygon.
- Path - Click this to add a path (line or lines).
- Image Overlay - Click this to add an image overlay on the Earth.
- Measure - Click this to measure a distance or area size.
- Email - Click this to email a view or image.
- Print - Click this to print the current view of the Earth.
- Show in Google Maps - Click this to show the current view in Google Maps in your web browser.
- Sky - Click this to view stars, constellations, galaxies, planets and the Earth's moon.
- Navigation controls - Use these to tilt, zoom and move around your viewpoint (see below).
- Layers panel - Use this to display points of interest.
- Places panel - Use this to locate, save, organize and revisit placemarks.
- 3D Viewer - View the globe and its terrain in this window.
- Status bar - View coordinate, elevation and imagery streaming status here.
Five Cool, Easy Things You Can Do in Google Earth
Want to jump in and start having fun with Google Earth? Try any of the the following:
- View an image of your home, school or any place on Earth
- Click Fly To. Enter the location in the input box and click the Search button. In the search results (Places panel), double click the location. Google Earth flies you to this location.
 Search button
- Go on a tour of the world - In the Places panel, check the Sightseeing folder and click the Play Tour button:

- Get driving directions from one place to another and fly (follow) the route - See Getting Directions and Touring the Route.
- View other cool locations and features created by other Google Earth users - In the Layers panel, check Community Showcase. Interesting placemarks and other features appear in the 3D viewer. Double click these points of interest to view and explore. See Using Points of Interest (POIs) for more information.
- View 3D terrain of a place - This is more fun with hilly or mountainous terrain, such as the Grand Canyon. Go to a location (see number 1 above). When the view shows the location, use the tilt slider to tilt the terrain. See Using the Navigational Controls and Tilting and Viewing Hilly Terrain for more information.
 Tilt slider
View samples of other things you can see and do in Google Earth.
This version of Google Earth has a number of exciting new features, including:
- Sky - View heavenly objects, including stars, constellations, galaxies, planets and the Earth's moon
- Many photos are now 3D objects that you can fly into and browse - learn more
- Support for KML 2.2
- Support for new language versions
- Videos in placemark balloons (Windows only)
Installing Google Earth
For information about installing Google Earth, visit the Google Earth Help Center.
System Requirements
To use Google Earth on a Windows PC, you must have at least the following:
- Operating System: Windows 2000, Windows XP, Windows Vista
- CPU: 500Mhz, Pentium 3
- System Memory (RAM): 128MB RAM
- Hard Disk: 400MB free space
- Network Speed: 128 Kbits/sec
- Graphics Card: 3D-capable with 16MB of VRAM
- Screen: 1024x768, "16-bit High Color" screen
To use Google Earth on a Mac, you must have at least the following:
- Operating System: Mac OS X 10.4 or later
- CPU: G3 500Mhz
- System Memory (RAM): 256MB RAM
- Hard Disk: 400MB free space
- Network Speed: 128 Kbits/sec
- Graphics Card: 3D-capable with 16MB of VRAM
- Screen: 1024x768, "Thousands of Colors"
To use Google Earth on a Linux computer, you must have at least the following:
- Kernel 2.4 or later
- glibc 2.3.2 w/ NPTL or later
- XFree86-4.0 or x.org R6.7 or later
- CPU: 500Mhz, Pentium 3
- System Memory (RAM): 128MB RAM
- Hard Disk: 400MB free space
- Network Speed: 128 Kbits/sec
- Graphics Card: 3D-capable with 16MB of VRAM
- Screen: 1024x768, "16-bit High Color" screen
Note that Google Earth may work on other configurations not explicitly listed here. The recommended configuration for Linux computers:
- Kernel 2.6 or later
- glibc 2.3.5 w/ NPTL or later
- x.org R6.7 or later
Google Earth has been tested on the following GNU/Linux distributions, but certainly works on others:
- Ubuntu 5.10
- Suse 10.1
- Fedora Core 5
- Linspire 5.1
- Gentoo 2006.0
- Debian 3.1
- Red Hat 9
Please make sure your system has properly-configured OpenGL drivers. If Google Earth appears to be slow and unresponsive, it is likely that your system needs different video drivers.
You can change the language displayed in Google Earth. To do this:
- Click Tools > Options (Mac: Google Earth > Preferences). Click the General tab.
- Under Language settings, choose the appropriate language of your choice. System Default corresponds to the language used by the operating system of your computer.
Google Earth Version 4.1 supports the following languages:
- Arabic
- Czech
- Dutch
- English
- French
- German
- Italian
- Japanese
- Korean
- Polish
- Portuguese
- Russian
- Spanish
In addition to this user guide, Google offers a number of resources that can help you use and enjoy Google Earth. These include:
- Tutorials: These provide hands-on lessons using the Google Earth.
- Google Earth Help Center: Use the Help Center at any time to find additional information.
- Troubleshooting: View information that specifically pertains to troubleshooting issues with Google Earth.
- Google Earth Community: Learn from other Google Earth users by asking questions and sharing answers on the Google Earth Community forums.
- Using Google Earth: This blog describes how you can use some of the interesting features of Google Earth.
Note: This section is relevant to Google Earth Pro and EC users.
When you first start Google Earth EC, the Select Server dialog box appears. This enables you to choose the appropriate server settings. Settings in this dialog box include:
- Server: Choose or enter the address for the appropriate server. For more information, contact your administrator.
- Port: The appropriate port for this server. For more information, contact your administrator.
- Always login to this server: Check this to automatically login in this server when you start Google Earth. Subsequently, this dialog box does not appear. To make it appear again when you start Google Earth, click File > Disable auto-login.
- Enable secure login: Check this if your work environment requires a secure login to this server. For more information, contact your administrator.
To add a database (server) that you can log into in Google Earth EC, click File > Add Database. To log out of a server in Google Earth Pro or EC, choose File > Server Log Out. To log in to a server, choose File > Server Login and choose the settings described above.
Tip - When you add another database (click File > Add Database), Google Earth logs into new database and maintains a connection to the existing database. Using this method, you can view data from up to eight databases simultaneously.
If you have Google Earth Plus, Pro or EC installed, you can deactivate this software. When you deactivate Google Earth Plus, the free version of the product replaces Google Earth Plus. When you deactivate Google Earth Pro or EC, the the license is removed so you can use the Pro or EC license on another computer.
To deactivate Google Earth Plus, Pro or EC, click Help > Deactivate Google Earth Plus/Pro/EC license.
Tip: When the Google Earth Pro/EC login and password appear, write these down so you can use them later to activate the software on this or another computer.
Tip: Follow a tutorial on this subject: Navigating on the Earth
In Google Earth, you see the Earth and its terrain in the 3D viewer. You can navigate through this 3D view of the globe in several ways:
You can also manipulate your view of the earth by tilting the terrain for perspectives other than a top-down view. Finally, you can reset the default view for a north-up, top-down view wherever you are.
To get started navigating with your mouse, simply position the cursor in the middle of the 3D viewer (image of the earth), click one of the buttons (right or left), move the mouse and note what happens in the viewer. Depending upon which mouse button you press, the cursor changes shape to indicate a change in behavior. By moving the mouse while pressing one of the buttons, you can:
- Drag the view in any direction
- Zoom in or out
- Tilt the view (requires middle button or scroll wheel)
- Rotate the view (requires middle button or scroll wheel)
The following table describes all the actions you can accomplish using the mouse:
| Move the view in any direction (north, south, east, or west) |
To move the view, position the mouse cursor on the viewer and press the LEFT/main mouse button. Notice that the cursor icon changes from an open hand  to a closed hand to a closed hand  . Pull the viewer as if the hand cursor is like a hand on an actual globe, and you want to drag a new part of the earth into view. . Pull the viewer as if the hand cursor is like a hand on an actual globe, and you want to drag a new part of the earth into view.
You can drag in any direction to reveal new parts of the globe, and you can even drag in circular motions.
|
| Drift continuously across the Earth |
If you want to drift continuously in any direction, hold the left/main mouse button down. Then, briefly move the mouse and release the button, as if you are "throwing" the scene. Click once in the 3D viewer to stop motion.
|
| Zoom in |
There are a number of ways to zoom in with the mouse.
- You can double-click anywhere in the 3D viewer to zoom in to that point. Single-click to stop, or double-click to zoom in more.
- If your mouse has a scroll wheel, use it to zoom in by scrolling towards you. Use the ALT (alt/option on the Mac) key in combination with the scroll wheel to zoom in by smaller increments. More settings.
- You can also position the cursor on the screen and press the RIGHT mouse button (CTRL click on the Mac). Once the cursor changes to a double arrow, move the mouse backward or pull toward you, releasing the button when you reach the desired elevation.
If you want to zoom continuously in, hold the button down and briefly pull the mouse down and release the button, as if you are "throwing" the scene. Click once in the viewer to stop the motion.
- On some Macintosh laptops, you can drag two fingers across the trackpad to zoom in and out.
|
| Zoom out |
There are a number of ways to zoom out with the mouse.
- Using the RIGHT mouse button (CTRL click on the Mac), double-click anywhere in the 3D viewer to zoom out from that point. The viewer will zoom out by a certain amount. Single-click to stop, or right double-click (CTRL click on the Mac) to zoom out more.
- If your mouse has a scroll wheel, you can use the scroll wheel to zoom out by scrolling away from you (forward motion). Use the ALT (alt/option on the Mac) key in combination with the scroll wheel to zoom out by smaller increments. More settings.
- You can also position the mouse cursor on the screen and press the RIGHT mouse button (CTRL click on the Mac). Once the cursor changes to a double arrow, move the mouse forward or push away from you, releasing the button when you reach the desired elevation. If you want to zoom continuously out, hold the right button (CTRL click on the Mac) down and briefly push the mouse forward and release the button, as if you are "throwing" the scene. Click once in the viewer to stop motion.
|
| Tilt the view |
If your mouse has a either middle button or a depressible scroll wheel, you can tilt the view by depressing the button and moving the mouse forward or backward. If your mouse has a scroll wheel, you can tilt the view by pressing the SHIFT key and scrolling DOWN to tilt the earth to "top down" view, or scrolling UP to tilt the earth for horizon view. See Tilting and Viewing Hilly Terrain for more information.
|
| Rotate the view |
If your mouse has either a middle button or a depressible scroll wheel, you rotate the view to the left by clicking on the middle button and moving the mouse to the left. To rotate the view right, click on the middle button and move the mouse to the right. You can also use the CTRL ( on the Mac) key in combination with the scroll wheel to rotate the view. Press CTRL ( on the Mac) and scroll UP to rotate clockwise, CTRL ( on the Mac) + scroll DOWN to rotate counter-clockwise. See Tilting and Viewing Hilly Terrain for more information. on the Mac) key in combination with the scroll wheel to rotate the view. Press CTRL ( on the Mac) and scroll UP to rotate clockwise, CTRL ( on the Mac) + scroll DOWN to rotate counter-clockwise. See Tilting and Viewing Hilly Terrain for more information.
|
| Mouse Wheel |
See above. To change these settings, click Tools > Options > Navigation > Navigation Mode > Mouse Wheel Settings (on the Mac: Google Earth > Preferences > Navigation > Navigation Mode > Mouse Wheel Settings). Move the slider to set how fast or slow your viewpoint of the earth zooms in or out. Check Invert Mouse Wheel Zoom Direction to reverse the direction of zooming when you use the mouse wheel. |
| Pan and Zoom navigation |
This mode is on by default when you start Google Earth. You can return to this mode from other modes by doing one of the following:
- Type Ctrl ( on the Mac) +T. When this mode is activated, the cursor changes to a hand symbol.
- (Windows and Linux) Tools > Options > Navigation > Navigation Mode > Pan and Zoom . (Mac) Google Earth > Preferences > Navigation > Navigation Mode > Pan and Zoom. If you use a joystick or other non-mouse controller, you can also change how perspective moves in the 3D viewer under Non-mouse controller settings. Note that these options are not available (greyed out) until you connect a non-mouse controller to your computer and check Enable Controller. Choose User-Based to move your particular vantage point or Earth Based to move the globe. Check Reverse Controls to reverse the actions of the joystick.
|
| GForce navigation (advanced) |
To change to this navigation mode, do one of the following:
- Type Ctrl ( on the Mac) + G to change when window focus is in the 3D viewer
- (Windows and Linux) Tools > Options > Navigation > Navigation Mode > Flight Control. (Mac) Google Earth > Preferences > Navigation > Navigation Mode > Flight Control.
This mode is in effect when the navigation cursor changes to an airplane. In addition, the effects of G-Force mode are most noticeable the closer you are to the terrain, and become less exaggerated the higher your eye elevation. The behavior of this navigation mode simulates that of a joystick, where the direction your mouse moves indicates specific joystick moves. If you are familiar with using a joystick, you'll be able to use this mode easily.
To pan left or right, or to tilt the horizon left or right, left-click and move the mouse right/left of center. To tilt to top-down view, left-click and move the mouse forward (away from you). To tilt to horizon view, left click and move the mouse back (toward you). To accelerate, right-click (CTRL click on the Mac) and move the mouse forward. To decelerate, right-click (CTRL click on the Mac) and move the mouse backward.
The response in the 3D viewer to your mouse movements is related to the vigorousness of your mouse movements, so you can test this mode out slowly using movements.
To return to standard trackball navigation mode, type Ctrl ( on the Mac) + T. To stop motion in the viewer at any time, press the spacebar.
|
| Click-and-Zoom navigation |
To change to this navigation mode, choose:
- (Windows and Linux) Tools > Options > Navigation > Navigation Mode > Click-and-Zoom
- (Mac) Google Earth > Preferences > Navigation > Navigation Mode > Click-and-Zoom
When the 3D viewer enters this navigation mode, the cursor changes to a cross-hair mark. Here, navigation with the mouse is limited: left-click to zoom in a set distance, and right-click (CTRL click on the Mac) to zoom out a set distance. Use the navigation controls to pan and rotate. Return to the standard trackball mode by typing Ctrl ( on the Mac) +T. |
To view and use the navigation controls, move the cursor over right corner of the 3D viewer. After you start Google Earth and move the cursor over this area, the navigation controls fade from sight when you move the cursor elsewhere. To view these controls again, simply move the cursor over the right corner of the 3D viewer.
Note - If the navigation controls do not appear when you move the cursor over the right corner of the 3D viewer, click View > Show Navigation > Automatically and try again.
To hide or show the compass icon in the 3D viewer, click View > Compass. See also Showing or Hiding Items in the 3D Viewer.
The Google Earth navigation controls offer the same type of navigation action that you can achieve with mouse navigation. In addition, you can use the controls to tilt the view (perhaps for a perspective on terrain) or to rotate the viewer around the center. The following diagram shows the controls and explains their functions.
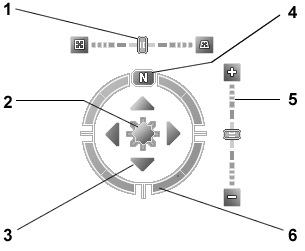
- Use the tilt slider to tilt the terrain toward a horizon view. Move the slider to the left for a top-down view or to the right for a horizon view.
Double click the icons at the end of the slider to reset the tilt all the way to a top-down view or to a horizon view.
- Use the joystick to move the center point of the view down, up, right or left. Click the center, hold the mouse button, and move in any direction.
- Click the direction arrows to move the view in the direction you wish.
- Click the north up button to reset the view so that north is at the top of the screen.
- Use the zoom slider to zoom in or out (+ to zoom in, - to zoom out).
Double click the icons at the end of the slider to reset the zoom all the in or out.
- Click and drag the navigation ring to rotate the view.
You can also use the keyboard to control navigation, see 3D Viewer Navigation in Keyboard Controls for more information.
When you first start Google Earth, the default view of the earth is a "top-down" view, which looks like the view straight down out of an airplane window when you are sufficiently zoomed in.
- Tilt the terrain from 0 - 90 degrees - You can use the mouse or the navigation controls to tilt the view in order to see a different perspective of the area you're exploring. You can tilt to a maximum of 90 degrees, which provides a view of the object as well as the horizon, in some cases.
- Turn on terrain - Using the tilt feature is particularly interesting when you are looking at a part of the earth where the terrain is hilly, so be sure to also have the terrain check box selected in the Layers panel when tilting the view.
- Rotate the view for a new perspective - Once you have tilted the view so that you are looking at a particular object, such as a hill, you can also rotate around that object. When you do this, the object remains in the center of the view, but you look at it from different perspectives (i.e., north, south, east, west) as you rotate around it.
- Use the middle mouse button (if available) for seamless movement - If your mouse has a middle button or a depressible scroll wheel, you can depress the button to both tilt and rotate the view. Movements up or down tilt the view, and movements left or right rotate the view. See Using a Mouse for more information.
The following figures show a comparison view of Mount Shasta in California with and without tilt enabled.
|

Top down view
|
|
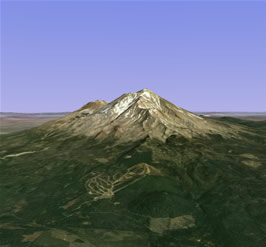
Tilted view |
You can adjust the appearance of the terrain if you would like the elevation to appear more pronounced. To do this, click Tools > Options > 3D View from the Tools menu (for the Mac, choose Google Earth > Preferences > 3D View) and change the Elevation Exaggeration figure. You can set it to any value from 1 to 3, including decimal points. A common setting is 1.5, which achieves an obvious yet natural elevation appearance. See Viewing Preferences for more information.
After tilting and rotating the 3D view in Google Earth, you can always quickly reset to the default north-up and top-down view by clicking on the appropriate buttons in the navigation controls.
- Click the North-up button
 to reset the view so that north is at the top of the viewer.
 - Click the Reset Tilt button
 to reset tilt to the default "top-down" view.
- (Windows and Linux only) Click in the 3D viewer and type r on the keyboard to reset the view (see Keyboard Controls for more).
Note: To quickly return to a known, familiar spot if you get lost, click on the
Starting location placemark in the
My Places folder. This returns you to the center of your country (or a country that speaks your language). You can also edit the location for the
Starting location placemark if you want to. See
Editing Places and Folders for more information.
Consider also using the Overview Map Window as a way to provide an additional perspective on your location, especially when you are zoomed in to unfamiliar places.
Setting the Start Location
You can set the starting (default) location that appears each time you launch Google Earth. To do this, navigate to the appropriate location and perspective and click View > Make this my starting location.