Creating a Narrated Tour in Google Earth Desktop
Tutorial Contents
-
Prerequisites
-
Let's Get Started!
-
Create a KML Tour
-
Re-record a tour to add new actions
-
Recording Narration
-
Tips & Tricks for Touring
-
Discussion and Feedback
-
What's Next
Prerequisites
Absolutely no programming skills needed!
In April 2017, Google Earth on Web was released, which puts Earth on the browser. However, for this tutorial, you will need Earth for Desktop installed on your computer. Download the latest version here.
Let's Get Started!
Open Google Earth.
Download the sample data to use during this tutorial, and open it in Google Earth.
For this exercise, make the Terrain layer visible. Go to the Layers panel, and scroll to the bottom. Check the box next to Terrain to make it visible.
Now, let's record a tour!
Create a KML Tour
Click the Add Tour button
 in the toolbar, or go to the Add menu, and select Tour.
The tour recording tools appear in the lower-left corner of the 3D viewer:
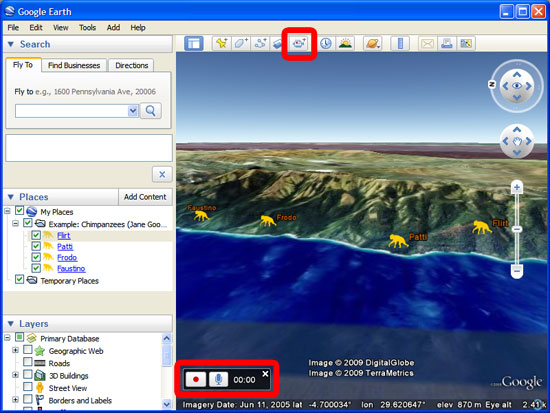
Click the Record button
 to start recording actions and movements in Google Earth. The button changes to red
  and the time counter begins counting up, showing the duration of your current KML Tour.
Create your tour by flying, zooming, panning, and rotating the globe. Do what you would do if you were showing your Google Earth project to a user or audience in person. A 3D Space Navigator, like the one created by 3D Connexion, can be extremely helpful for navigating smoothly across the globe.
Double-click on placemarks in the Places panel to move to their unique camera angle or view. In this example, double-click on the placemark 'Flirt', then 'Patti', and so on. You can also pop placemark balloons and turn on and off your placemarks, paths and polygons in the Places panel.

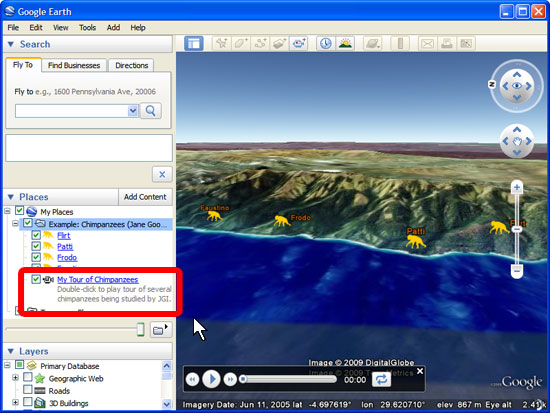
When you are finished creating your tour, stop recording by clicking the Record button
again. Your recording stops, and the Tour Player appears in the bottom-left corner of the 3D viewer. The KML Tour that you just created automatically begins playing.
To save your KML Tour, click the Save to File button in the Tour Player, and give your KML Tour a name.


It is then stored in the Places panel.
To save it to a permanent .kmz file, right-click the tour in your Places panel, choose Save Places As…, and save your .kmz file to a location on your computer.
If you used content in your tour (clicked on placemarks, popped balloons, etc), you must put that content along with the tour into a single folder, and save that entire folder as a KMZ. Otherwise the file will have the tour only, and no content.
Re-record a tour to add new actions
Want to add more actions to your tour? You can modify and extend a previous tour by re-recording a new tour while playing back the original tour.
Make sure your original tour is in the Places panel.
Click on the Add Tour button
in the toolbar to add a tour. The tour recording tools appear at the lower left.Click the Record button
to start capturing a new tour. After clicking the record button, the time counter starts advancing, showing the duration of your new tour.Now start your original tour by double-clicking on it in the Places panel, or select it with the mouse and click the Play Tour button
 underneath the Places panel. You are now recording a new tour while playing back the original one.
You can pause the original tour, add some new actions or camera movements, and then un-pause/play the original tour to continue. Note: if you move the earth during the pause of the original tour, when you hit play on the original tour the camera will jump to the where the original tour left off.
Once the original tour is done playing back, since you are still recording a new tour, you can continue to add new actions or even start playing back another tour!
To see what a completed tour looks like, download the finished product here
Recording Narration
When creating a new tour, if you click the microphone button
 instead of the record button, recording will start and Google Earth will start capturing audio from your computer's microphone. You can also turn on/off audio recording by clicking the microphone button again.
Audio recorded through your microphone is captured as an .mp3 file that is saved with the tour when you save it as a KMZ file.
Make sure when saving a Tour with audio narration to set the 'Save as Type' option in the Save window to KMZ, otherwise the audio will not be included in your file.
Tips & Tricks for Touring
- When adding an iteration to an existing tour, you can click and hold on a location on the globe (i.e. building, mountaintop, etc.), and the camera will stay on that location, swiveling around it. When you un-click from that location, the previously recorded tour will continue as before.
- Navigation through time is captured in the tour, so if you drag the time slider while recording a tour, any actions that cause changes in the 3D viewer (appearing/disappearing points, animations, etc) will be recorded. For example, if you have Historical Imagery turned on (link), or have a time-animated KML in My Places, try recording a tour and also manipulating the time slider (in the upper left of the 3D map view). This allows you to make tours of time-animated layers, like the Declan Butler Avian Flu map, and also showing historic imagery from different time periods.
- KML Touring allows for more advanced actions than can be recorded by the simple Add Tour feature in Google Earth. This includes dynamically moving placemarks, lines and 3D models, adding pauses to the tour, and changing the styles of your features during the tour. However, you will need to hand-edit the KML to create these actions. Please see the Touring in KML documentation on the KML documentation site for more information.
Discussion and Feedback
Have questions about this tutorial? Want to give us some feedback? Visit the Google Earth Help Community to discuss it with others.